Simple DIY Metal Detector
Simple DIY Metal Detector
For beginners, a simple circuit of a metal detector on two coils is based on the principle of disrupting the synchronization of these same generators. There are many different circuits of metal detectors on the Internet, but it is quite difficult for a novice radio amateur to correctly set up and adjust the assembled circuit without an oscilloscope. We offer to assemble a simple metal detector with your own hands with simple settings.
Metal detector characteristics
- a coin the size of 5 kopecks USSR detects up to 15 cm;
- metal can lid – up to 30 cm;
- metal sewer hatch – up to 60 cm.
- can work in water.
- One battery charge is enough for 20-30 hours of operation.
- Current consumption – 15 mA.
- Weight 500 grams.
Adapts to the corresponding soil and can work in water even with good sealing of the coils. The type of metal can be determined by a certain sound in the headphones.


The circuit is not critical to power supply, number of turns and component ratings.
There is only one condition: the left and right parts of the diagram must be the same!
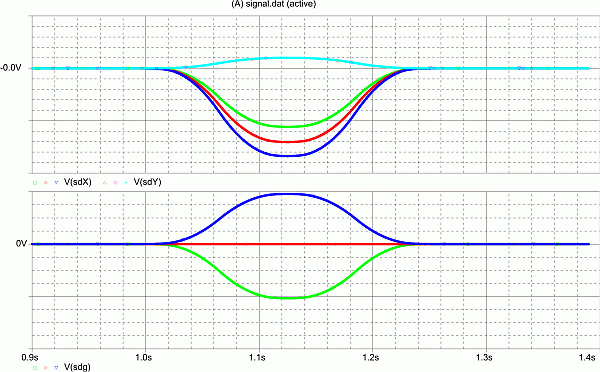
Interference is compensated, the ground does not affect. Sensitivity does not depend on the circuit, but on the physics of measurements. We accumulate phase shift.
The symmetrically assembled circuit works immediately. But it is interesting to watch.
With a 4 V supply on the coils, about 40 V can be fed directly to the tube.
Signals from the generators are fed to the X and Y plates .

The frequencies match
Here they are, breakdowns.
Clicks appeared in the headphones.

The generators are not synchronized.

We assemble the parts using any non-conductive glue.
If the power supply battery is dead and runs down, then the setting will float away. A phone battery is good.


For the structure we use a metal-plastic water pipe. The rod can be detachable, pipes with a diameter of 26 and 20 fit tightly into each other. Capacitors with good temperature stability, mica – this is important.
Cover the coils and the pattern with oil varnish. There are 10 cm between the coils. Place the coils at a distance of 10 cm and glue them – no need to move them

Butterfly metal detector circuit with one speaker


Source:majstin.narod.ru
Parts list:
- Transistor – KT315 (BC182, BC546, BC547, etc.) – 2 pcs;
- Capacitor – 1000 pF (1 nF or 102) – 2 pcs;
- Capacitor – 10000 pF (10 nF or 103) – 2 pcs;
- Resistance – 100 kOhm – 2 pcs;
- Regular stereo headphones – 1 pc;
- Power supply (from a mobile phone) – 3.7 V – 1 pc;
- Wire in varnish insulation PEV, PEL, PETV, etc. with a diameter of 0.4-0.7 mm.
If you do not have all the necessary parts and the board,
You can order them from us
all necessary parts with printed circuit board.
More about radio dialing…
How to wind coils?
Detailed explanation of making the coil: 0th turn is the beginning of the coil (soldered to the bottom track in the diagram (battery minus). Next, wind the coil (for example, on a saucepan), once 10 turns have been made, twist the loop, strip the insulation and solder to the middle tap in the diagram, ie to the emitter of the transistor ( this will be the tap ). Then wind another 20 turns , cut it off and solder the end of the wire to the junction of two capacitors 1000 pF and 10,000 pF ( this is the end of the coil ).
Setting up a metal detector
When it beeps, it’s good! But still, it is not always possible (for various reasons) to make identical generators, so it is necessary to adjust one of them to the frequency of the other.
Rough tuning with the last turn of the coils
Take a sheet of aluminum or a larger tin can. Bring it to the coils one by one. The squeak is even higher above one, and it dies down above the other. On the coil where it dies down, bend the last turn inward (or move the coils, decrease or increase the distance between them), achieve the quietest squeak or until the signal dies down. It is essential to glue tubes with ferrite on top of each coil. You can then adjust it with a ferrite rod until complete silence.
Tuning with a ferrite rod
To do this, take a tube and a ferrite rod, attach it next to one of the coils. Move the ferrite rod in the tube until you synchronize the generators. Ferrite rod with a coil from an old radio (can be a tube). Wind all the wires, leave the frame with the ferrite rod.
Video instructions for setting up a metal detector
You can adjust it with aluminum strips, gluing them to the coil inside or outside. To adjust, put an aluminum strip on both coils or just tin lids and move them, achieving the lowest hum tone.
If you can clearly hear clicks in the headphones, this means that the sensitivity of the device is at maximum.
Another option for adjusting the frequency is to install a variable capacitor, for example from an old radio, in parallel with the 1000 pF capacitor.
Installation of a metal detector
If you don’t have a board made of foil-coated textolite or getinax, you can make the board out of cardboard.
Photos of the manufacturing options for the printed circuit board of this metal detector


Photo of metal detector Vladimir Nosikov


Photo of metal detector Dmitry Kosnov